Threat modeling is a proactive security process that helps you find vulnerabilities in your application before it’s built, rather than waiting for an attack to happen. This guide breaks down the simple, four-step approach to identifying, analyzing, and mitigating potential threats. By learning to “think like an attacker,” you can design and build more secure systems from the ground up
In cybersecurity, it’s easy to get stuck in a reactive mode—patching holes only after they’ve been discovered (or worse, exploited). But what if you could find those holes before you even finished building?
That’s exactly what threat modeling is.
Think of it as reviewing the blueprints of a new house to find security flaws—like a missing lock on a back door or a window that’s easy to pry open—before the house is built. It’s a structured way to think proactively about security, and it’s a skill anyone in tech can learn.
Ready to build your knowledge from the ground up? Let’s go.
Step 1: Start with the “Why” (The Core Mindset)
Before you learn any fancy acronyms, you need to adopt the threat modeling mindset. This entire process is just a way to methodically answer four simple, powerful questions:
- What are we building? (Understanding the system)
- What can go wrong? (Identifying threats)
- What are we going to do about it? (Defining mitigations)
- Did we do a good job? (Verifying the fixes)
Keep these questions in mind. Everything else is just a tool to help you answer them.
Step 2: Learn to See Your System (Data Flow Diagrams)
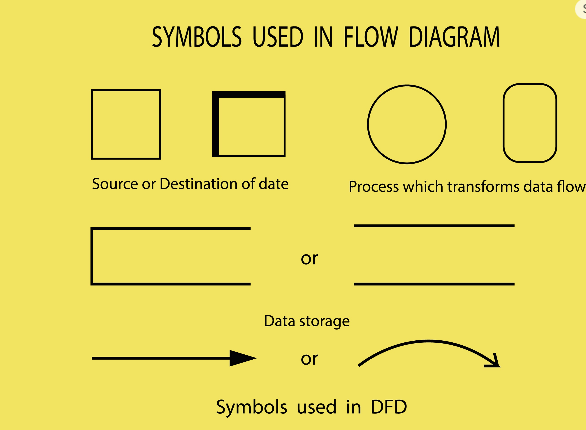
You can’t secure what you don’t understand. The first step in “What are we building?” is to create a visual map. The most common tool for this is a Data Flow Diagram (DFD).
A DFD shows how data moves through your application. It’s a simple “whiteboard-style” drawing with just a few key components:
Below are the some links where we can download the DFD tools
Microsoft Threat Modeling Tool (Recommended for Beginners)
This is a free, stand-alone tool for Windows. You draw your diagram using its built-in symbols, and it will automatically generate a list of potential STRIDE threats for you to analyze.
- Download Page: Microsoft Threat Modeling Tool
OWASP Threat Dragon
This is a free, open-source tool from the security non-profit OWASP. It works in your web browser (so no download is needed), or you can download it as a desktop app.
- Web App (Easiest to start): https://threatdragon.org/
- Main Project Page (with desktop downloads): OWASP Threat Dragon Project
Step 3: Brainstorm “What Can Go Wrong” (The STRIDE Methodology)
Once you have your DFD, it’s time to find the flaws. To brainstorm “What can go wrong?” you can use a simple mnemonic called STRIDE.
Developed by Microsoft, STRIDE is a way to categorize almost every possible threat. You look at each part of your DFD (especially those trust boundaries!) and ask:
- Spoofing: Can an attacker impersonate someone or something else (like another user)?
- Tampering: Can an attacker modify data (like changing the dollar amount in a shopping cart)?
- Repudiation: Can an attacker deny they did something (like claiming “I never approved that transaction!”) because you don’t have proper logs?
- Information Disclosure: Can an attacker see data they shouldn’t (like another user’s private messages)?
- Denial of Service (DoS): Can an attacker crash or overwhelm your system so it’s unusable for others?
- Elevation of Privilege: Can an attacker gain powers they shouldn’t have (like a regular user becoming an admin)?
By walking through STRIDE for each process, data store, and data flow, you’ll generate a fantastic list of potential threats.
Step 4: Prioritize Your Fixes (Simple Risk Rating)
You’ll quickly find a lot of potential threats. Don’t panic! You don’t need to fix everything at once. Now you move to “What are we going to do about it?” by prioritizing.
A simple way to rank your threats is to estimate their Risk.
Risk = Likelihood x Impact
- Likelihood: How easy is it for an attacker to do this? (High, Medium, or Low)
- Impact: How bad would it be if this happened? (High, Medium, or Low)
Focus your energy on the High-Risk items first (e.g., “High Likelihood” + “High Impact”). For every threat you decide to fix, you’ll propose a “mitigation” or “countermeasure”—like adding encryption to prevent Information Disclosure or using multi-factor authentication (MFA) to prevent Spoofing.
Step 5: Practice, Practice, Practice (And Use Free Tools!) 🛠️
Threat modeling is a skill, not just a theory. The only way to get good at it is to do it.
- Start Small: Pick a single feature of an app you use, like a “password reset” function.
- Draw the DFD: Map it out.
- Apply STRIDE: List all the threats you can think of.
- Prioritize: Rate the risks and suggest a fix for the top one or two.
Refer Step-2 for the free Tools Download.
Your Journey Starts Now
You’ve just learned the entire threat modeling loop. You now have a framework to think like a security professional and find flaws before they become disasters.
Want to go deeper? Here are the best places to continue your learning:
- OWASP Threat Modeling Cheat Sheet: The best two-page summary on the topic. Read this first.
- Microsoft Learn: Search for the free “Threat Modeling Security Fundamentals” learning path.
- The “Bible”: When you’re ready to go all-in, pick up a copy of Threat Modeling: Designing for Security by Adam Shostack.
Happy (threat) hunting!

Leave a comment